Brush

The main tool in Black Ink, it allows you to draw on the currently selected layer. In Black Ink, the Brush tool can have only one brush active at a time. To activate another brush, there are several possibilities, such as going through the Brush Manager or using a shortcut like num + 1.
Main view
When the tool is active, simply draw with the mouse or a stylus (preferably) in the Main View or the Secondary View to fill the content of the currently selected layer.
Quick Settings

Like the other tools in Black Ink, the Brush tool will display parameters in the Quick Settings location.
Quick Brush Search
Next to the brush tool icon, there is a preview of the currently selected brush in Black Ink. By clicking on this preview or the arrow to its left, you can quickly change brushes. You can also search for a brush by its name if needed.
Smoothness
When drawing, this parameter allows you to add smoothness to the position of the stylus or mouse on the stroke to avoid any possible tremors or to achieve a smoother result. This parameter is common to all brushes. When a high value of smoothness is entered, you may see a small orange line between the current position of the mouse pointer and the last position of the stroke.
Straight line draw mode
When this mode is active, it allows you to draw straight lines with the currently selected brush. To do this, click and hold, then release to display the line drawn with the desired brush. The speed/pressure parameters at the beginning and end of the line correspond to what you applied during the stroke.
Furthermore, this mode will overlay the snap points of the starting and ending points of previous lines on the View. This is useful for quickly and instinctively creating structures or grids. The evolving parameters of the lines (such as pressure, speed, etc.) will be automatically interpolated based on those found at the key points to achieve something coherent and continuous.
Options
By right-clicking with the mouse on the icone, you can access the options for the Straight Line mode.

| Straightline settings | Description |
|---|---|
| Snap radius | Specifies the size in pixels of the snap points displayed on the view. |
| Line start | Determines the length in pixels over which dynamic values of the stroke (pressure, speed, etc.) will be interpolated at the beginning of the line, affecting the line's shape. |
| Line end | Specifies the length in pixels over which dynamic values (pressure, speed, etc.) of the stroke will be interpolated when connecting it to a destination, affecting the line's shape. |
| Rollback smoothing | Sets the length in pixels over which dynamic values (pressure, speed, etc.) will be interpolated in the middle of the stroke, influencing the line's shape. |
| Show tooltip | When enabled, displays the angle and length in pixels of the currently drawn line. |
Note
All values are expressed in pixels of the view, not in pixels on the canvas.
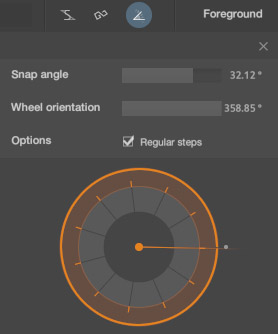
Angle snap
If you enable this option, you will constrain an angle when creating lines. It is also possible to temporarily activate this function by pressing and holding the Shift key when starting to create lines.
| Angle snap settings | Description |
|---|---|
| Snap angle | Sets the possible angle increments. |
| Wheel orientation | Changes the base orientation by modifying this parameter. |
| Regular steps | If enabled, it constrains regular angle increments regardless of the values entered in snap angle. |
Note
You can directly modify the wheel orientation parameter by clicking on the preview.
Other parameters
According to the selected brush type, other parameters may be added. Most of the time, you will find:

| Brush parameters | Description |
|---|---|
| Brush color | Default brushes will apply the global color (foreground or background). However, other choices are possible, such as a local solid color, a gradient, or a color derived from a position in an image. |
| Blending | The blending mode applied when the brush's primitives are displayed in the destination Layer. |
| Size | The size of the primitives that make up the brush. |
Note
Keep in mind that since Black Ink allows for extensive customization of brushes, these values can be replaced by others depending on the brush profiles.
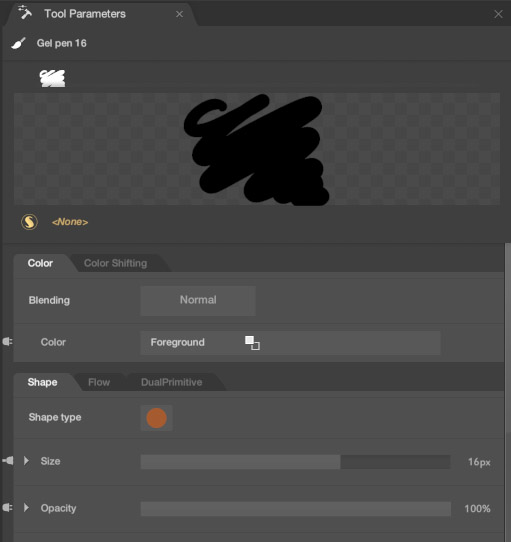
Parameters
The brush parameters will be displayed in the Tool Parameters panel. These parameters are much more comprehensive than those available in the Quick Settings. We will now detail how these parameters are displayed.
Title

Title bar displaying, among other things, the brush name. On the left, there is a brush management menu that allows you to perform these actions:
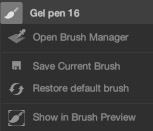
| Brush management menu | Description |
|---|---|
| Open Brush Manager | Will open the Brush Manager |
| Save Current Brush | If you have made any modifications to the brush, this allows you to save them to the disk. |
| Restore default brush | Restores the brush settings found on the disk. |
| Show in Brush Preview | Will open the Brush Preview |
Historic

Each brush has its history. This history is enriched every time you modify the brush settings and use it. For example, if you change its size, the previous, smaller version will be added to the history. You can then retrieve these settings by clicking on the corresponding thumbnail.
Preview
This area is not just an image representing the brush; it's also a full-fledged canvas with almost the same functionalities as the Main Canvas View. Therefore, you can draw a different preview if necessary. By right-clicking, you will have the following options:
| Preview option | Description |
|---|---|
| Restore default preview | Restores the default preview. |
| Clear preview | Clears the preview. |
BSL

It is possible to assign a Brush Shader to a brush by clicking on this parameter. The Brush Shader is a small program that determines how each pixel of the brush will be rendered. This can give it material properties based on parameters such as pressure, speed, stroke length, time spent, etc. The possibilities are vast and depend on your imagination and your knowledge of graphic programming. For more information, see the section dedicated to BSL
By clicking on the parameter (if it's empty), we will have this menu:
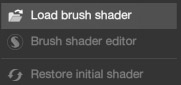
| Menu with no brush shader | Description |
|---|---|
| Load brush shader | Allows you to load a pre-existing Brush Shader in Black Ink. Once loaded, it assigns it to the brush. |
| Brush shader editor | Opens the Brush Shader Editor. It allows you to view and directly edit the brush shader. |
| Restore initial shader | Restores the shader that was present during the last brush save (version on disk). |
If a brush shader is already present, the menu will look like this:
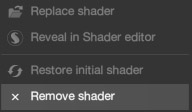
| Menu with brush shader | Description |
|---|---|
| Replace shader | Loads a pre-existing Brush Shader in Black Ink. Once loaded, it replaces the current shader with the chosen one. |
| Reveal in Shader editor | Opens the Brush Shader Editor. It allows you to view and directly edit the brush shader. |
| Restore initial shader | Restores the shader that was present during the last brush save (version on disk). |
| Remove shader | Assigns an empty shader to the brush. |
By choosing or programming a Brush Shader, you can radically change the brush's rendering. New parameters may also be added to the list of brush parameters (see below).
Parameters
All brushes will have parameters dedicated to them. Each parameter can modify all or part of the brush's rendering. Some parameters will be common to all brushes, while others will depend on the brush type or will be derived from the Brush Shader applied to the brush.
Brush parameters are laid out linearly but can be grouped into tabs. Each tab can be grouped together to form blocks. You won't be able to arrange the parameters as you please because it will be automatically suggested by the brush or its brush engine. However, parameters from the BSL can be moved or arranged according to certain rules, as discussed here (BSL).
Let's explore a series of standard parameters type that can be used by brushes.
Type

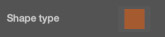
These parameters allow you to choose from a pre-determined set based on a given Type. Typically, you can click on the Type and select your desired option from a dropdown list or a spread box.
Example of possible Types: Blending, Shape Type,...
In any case, you should refer to each brush for an explanation of the meaning of the given Type.
Color Type
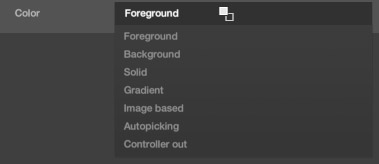
Specifies the type of color to choose for a brush primitive.
| Color type | Description |
|---|---|
| Foreground | The assigned color will come from the global Foreground color. |
| Background | The assigned color will come from the global Background color. |
| Solid | When this parameter is chosen, the color is local to the brush. |
| Gradient | When this parameter is chosen, you can set a gradient as an attribute. The color applied to the primitive at a given moment will be taken from the gradient based on the assigned controller, or it will default to the color at position 0 of the gradient. |
| Image Based | The color is sampled from an image based on the position of the primitive relative to the image's placement. |
| Autopicking | The color is picked up directly from where the stroke begins. It's the visible color of the canvas. |
| Controller Out | The color is retrieved directly from the controller. |
Solid
Choosing this type allows you to define a local color. You have three possibilities:
- By hovering the mouse over the color, you can choose a color from the color history and adjust the alpha of the current color.
- By clicking on the color, you will open the color selection dialog.
- By clicking on the arrow to expand the parameter. In this case, the equivalent of the color selection dialog is directly available below the parameter.
Gradient
to be completed
Shortcuts
Here are some useful shortcuts for this tool:
| Command | Description |
|---|---|
| Press B | Select brush tool |
| Hold Alt and choose a color | Pick a color using the eyedropper |
| Hold E | Current brush becomes an eraser |
| Press E | Select eraser tool |
| Press Num 1 - Num 5 | Select favorite brush from its slot |
| Hold Num 1 - Num 5 | Choose a brush from its slot |
| Hold S and set | Change the current brush size |
| Hold D and set | Adjust the brush opacity |
| Press K | Straight line draw mode (on/off) |
| Hold Shift | Snap angle |
| Hold Z and set | Smoothness |